Do you want to generate business leads through social media platforms especially using Facebook? If yes, you are in the right place to know the solution.
Nowadays, many organizations are using social media platforms to boost their business. This is because social media platforms help to reach a large set of target customers, than any other means. Among the social media platforms, Facebook acts as one of the effective mediums to gain your high prospect business leads. Lately, Facebook has become an essential tool for developing business, whether it is a small business or an MNC.
Using Facebook, you can create a community related to your business, promote your content and also improve your brand identity.
This blog demystifies the features that help you to generate business leads via Facebook.
Let’s see, how to create Lead ads on Facebook?
Step 1: Create an account on Facebook
You have to create or use your existing personal Facebook account.
Step 2: Create a business account under your FB account
- Create your business account from your FB account using the link – https://business.facebook.com/
- This will help you to hide your personal information and show only business-related details.
- During the process of creation, if you already have pages created, they can be linked to this new business account.
- You can also add another user to your business account.
Step 3: Create a page from the Facebook account
If pages are not created yet, you need to create a page in your business account. The page can be named after your business or the products & services.
To create a new page, follow the steps below

- In the FB page, click Menu ( 9 dots on right-hand side top) -> click ‘Page’ option
- Use the “Create a Page’ option to create your own Facebook page
Step 4: Run Ad Campaigns on Facebook:
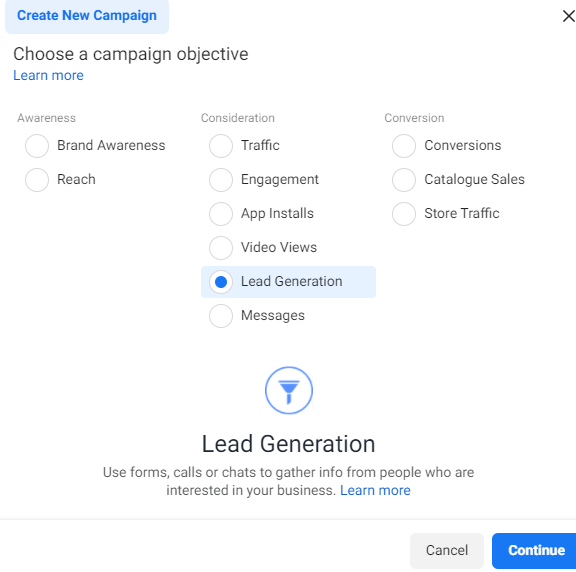
On Facebook, there are different types of Ad campaigns. To generate leads, you need to prefer a ‘Lead Generation’ ad campaign.
The Lead Generation Ad Campaigns on Facebook is the most popular tool. This tool will let your post reach a wide range of your target customers, who are all interested in your products and services.
Create Lead Generation Campaign:
To create your Lead generation campaign, you need to go to Ads Manager under Business suit.
Follow the below steps to get access to Ads Manager
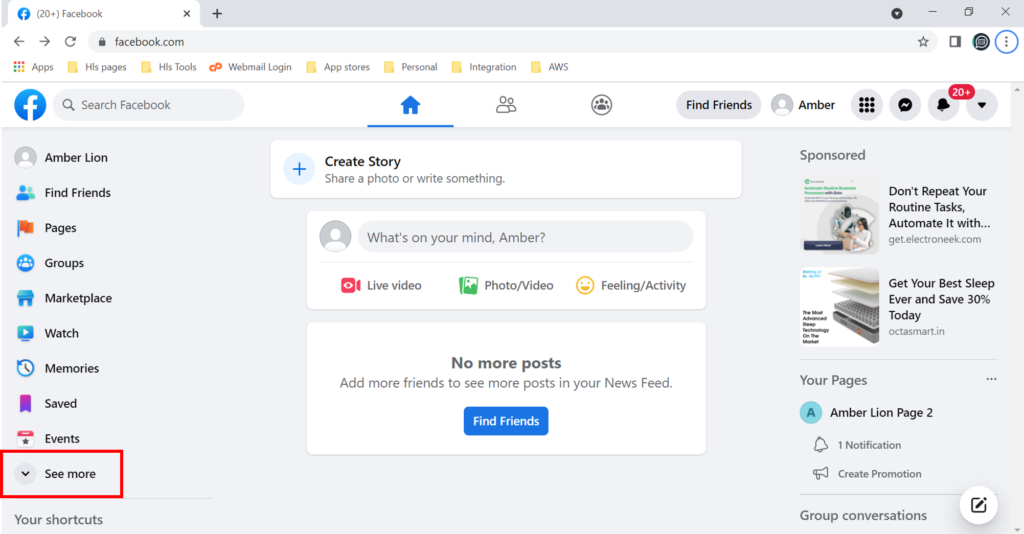
Once you log into Facebook, click ‘See more’ in the Left-hand side Menu to get access to ‘Ads Manager option’
To create your lead ad from Ads Manager you can follow the below guidelines given by Facebook.
- Go to Ads Manager -> Click + Create in the top left -> Choose the Lead Generation objective and then click Continue.

- Add your campaign details, A/B test and campaign budget optimisation information if needed, then click Next.
- In the Lead method section, select Instant Forms. Note that if you’d prefer to have people call your business to become leads, you can create a call ad.
- In the Page section, choose the Facebook Page you’d like to use to create lead ads. If this is the first time you’re creating a lead ad on this Facebook Page, click View Terms. Review the Lead Ad Terms and select I agree to Terms and Conditions.
- Choose your budget, audience and placements. Note that unlike other campaign types, you can’t show lead ads to people under the age of 18. Click Next.
- In the Optimization and delivery section, click the Leads drop-down and choose how you want to optimize the delivery of your ad.
- For the maximum number of leads, choose Leads.
- For the highest quality of leads, choose Conversion leads. While not required, we recommend that you work with a developer to integrate your CRM (customer relationship management) system when you choose this option. Learn more about how to set up your CRM for conversion leads.
- In the Identity section, select your Facebook Page and attach your Instagram account, if applicable.
- In the Ad setup section, select Single image or video or Carousel.
- In the Ad creative section, choose the image(s) or video(s) that you would like to use for your ad.
- Add the headline, description and other text to be included in your ad. Include the call-to-action button that is most relevant to your form.
- In the Question format section, select Instant Form.
- Note: You can also use the Lead Generation objective to encourage people to start a chat with your business in Messenger. To do so, choose Automated chat instead of Instant Form and follow the instructions here.
- If you chose Instant Form, you have several options for creating a form:
- Click Create form to create a new Instant Form.
- Click the Duplicate button next to a form you’ve already created. This creates an exact copy that you can modify.
- Click the Edit button next to a draft to modify the form. You cannot edit a form that has been published, but you can duplicate a published form and make changes.
- If you clicked Create form, the Create form window will open. Name your form in the Form name section.
- In the Form type field, choose which type of Instant Form you wish to use.
- Choosing More volume will allow you to create a form that is quick to complete and submit on a mobile device.
- Choosing Higher intent will add a review step that gives people a chance to confirm their information before submission.
- In the Intro section, add an introduction screen to your Instant Form. You can use this introduction section to include an image, headline and description that explains more about your product or service.
- In the Questions section, click + Add Question to add up to 15 questions. Custom questions allow you to get answers to the questions that are most important to your business or organisation. You can also include prefill questions to ask for user information.
- In the Description field of the Prefill questions section, inform people how their information will be used or shared. You may only use the information collected in your lead ad for the purposes stated in this notice.
- Choose which information you’d like to have prefilled in your form. You can add categories using the + Add Category button.
- In the Privacy section, add link text and a URL in the Privacy policy field. You can also click + Add custom disclaimer if you want to add additional disclaimers to your Instant Form. Custom disclaimers have no character limit.
- In the Completion section, add a headline, description, call-to-action button, and link to help keep your leads engaged after they submit the form. The Headline and Call-to-action text fields can include up to 60 characters.
- the arrows at the top of your Form preview to make sure that your complete form looks the way you want it to.
- Click Publish to complete your form. Click Save draft if you think you’ll want to make changes later. Once an Instant Form has been completed, you cannot edit it.
- Complete the rest of your ad by adding information in the Tracking section, if applicable.
- When you’ve finished, click Publish to publish your lead ad.
When a person clicks on your lead ad from Facebook, they are taken to an on-Facebook Instant Form. Likewise, when they click on your lead ad from Instagram, they are taken to an on-Instagram Instant Form. On this form, they can edit their pre-filled information and answer the custom questions you’ve asked before clicking the Submit button.
After people have submitted your form, you can download your leads data directly from Ads Manager or your Facebook Page, or connect to a CRM system.
I hope this blog helps you to generate business leads using Facebook and improves business opportunities.
Adding users to your business account
While creating a Business account, Facebook will give you an option to add more users to work with you on the ads to be created.

Enter the email id of the user, choose the respective role to invite them. Click Next, review the summary, and ‘Confirm’.
Users can also be added after the ads are created. To add more users to your account, follow the below steps

- Go to Ad Manger ( How?) -> click the 3 Horizontal lines ( All Tools) on the left-hand side menu -> Business settings -> FB will display the existing business accounts.
- Choose the business account where you want to add your users.
- Choose People from Left side Menu -> Click ‘Add’ and enter the email id to invite them. You can also assign the preset business roles while inviting them.